Tuesday, August 12, 2014

DebrisMaker2 - Procedural geometry creation tool for 3dsMax FREE !!

The DebrisMaker2 is the completely free procedural geometry creation tool for 3ds Max, that lets you quickly create objects for your 3D scenes.


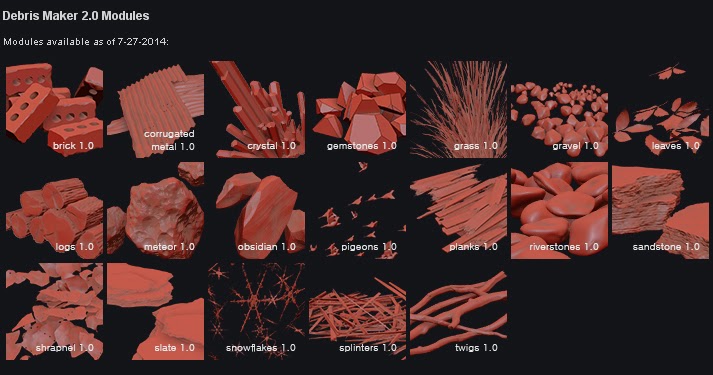
With the DebrisMaker2 you can create brick, corrugated metal, crystals, gemstones, snowflakes, grass, gravel, leaves, logs, splinters, meteors, obsidian, pigeons, planks, twigs, river stones, sandstone, shrapnel and slate! You can input parameters to customize the style of your debris, to match your desires.

The Debris Maker is a collection of scripts for 3dsMax that procedurally generate and sometimes animate geometry. Intended to help streamline adding detail to a scene, by creating lots of versions of something quickly, that you can edit, or choose from. The Debris Maker has only been tested in 3dsMax 2013 and 2014, and on windows 7, 8 and 8.1 platforms, however it should work as back 3dsMax 2009, up to current versions.

Wednesday, July 9, 2014

Vray renderer settings - Explanation

Here we have in depth explanation about what each render setting does within Vray.

Here is what we found works for rendering settings using vray. There are many stories on various forums on what makes a difference, but I hope these settings will get people started and able to use vray for production output; which are primarily what these settings are for. However if you need more information as always visit the chaos forums. (www.chaosgroup.com/forums/vbulletin/).

There are 2 other key methods, adaptive and using pure brute force for animation passes which I’m hoping to put in another post… watch this space and I’ll put a link to it when I get 5mins off the work computer!

So the following goes through the 2 all important tabs within the vray renderer, “vray” and “indirect illumination” tabs. The common tab you should know from a basic knowledge of max, of which I will not go into here.

Sunday, June 29, 2014

How to use Render Mask script in 3Ds Max ??

This tutorial will show you how to install and work with the RenderMask script for 3ds Max by Ivan Tepavicharov.

RenderMask helps you render luminance, RGB mask from selected objects. The script don’t affect the scene materials, lights and render settings.


Download RenderMask: tepavicharov.com/scripts.html

Saturday, June 7, 2014

Tips : How to Optimize Your Hardware for Autodesk 3ds Max and faster rendering ??

Autodesk 3ds Max and Autodesk 3ds Max Design software are applications for the creations of special effects for TV and movies, video games and design visualization assets. With such broad capabilities, the software’s systems requirements reflect the diverse aspects of this powerful tool.
Often I see 3ds Max used to review hardware speeds and capabilities because it will draw on every morsel the hardware can give. So, while the development team here at Autodesk works hard on giving you a good list in their system requirements documents, here are some hints to help you get the most out of your 3ds Max experience.
 

Processor

3ds Max relies on your systems processors for a number functions, and as 3ds Max develops, more and more of these functions should become multithreaded.
The most dramatic use of processor is during rendering. Taping into every processor available on the machine, some rendering technologies like mental ray can actually draw on processors from other PCs through its distributed bucket rendering settings.  So when it comes to rendering there’s no doubt that faster and more processors help.

Monday, June 2, 2014

Modeling, Lighting and post production tutorial for interior Visualizations (3ds Max, V-Ray, Photoshop).

Modeling and post production tutorial by ADC Visualizations (3ds Max, V-Ray, Photoshop).

Hi, folks!

My name is Andrea, I am the owner of ADC Visualizations, and i'm gonna share with you the making of "Villa Bonafe - Living room" interior design concept. So let's start!

CONCEPT

This living room is a part of an interior design concept for a house located in Cortina D'Ampezzo (well known in Italy as nice location for winter holidays). The location has a nice mountain view outside so the main goal of the living room was to make this panorama the star of the house: cold outside but very warm and comfortable when you are inside the house.
So that was the main idea: a large open space for living/dining room, with a big window in the front to enjoy the wide terrace and nice panorama. So i decided for a double height room, wooden ceiling and floor. I put a modern fireplace in the center of the room. I'm not gonna go further on design choices because it's not the goal of this tutorial.

BONAFE_makingof_01ref.jpg

So, the first thing I did was looking for good references for inspirations. That's what I found

Thursday, May 29, 2014

How to use Linear Workflow in Vray ?? Advantages of Liner Workflow in 3D Rendering

1531_tid_main.jpg

This has been the subject of discussions on many forums over recent years. I realized that there were all sorts of tutorials offering often conflicting information regarding the process. This is not the only way, just my way. I would like to thank my mates Ben Cowell and Phil Shoebottom for offering some clarity on a few points.


What is "Linear Workflow"?

Look at Fig.01. What is the difference between the image on the left and the image on the right? The truth is; nothing at all, except the way your monitor is showing you the image.

1531_tid_fig01.jpg
Fig. 01


V-Ray and 3ds Max process the data in which to make an image in "linear space", also known as Gamma 1.0, but by default all monitors show you the image with a Gamma of 2.2 (sRGB), which basically makes the image look dark, although it actually isn't dark at all. The program just assumes that you are viewing the image with Gamma set to 1.0, instead of 2.2, until you tell it otherwise.

Unfortunately this has always been the case with 3D rendering, which means that many artists who don't know about linear workflow learn to light scenes by using a handful of tricks to try and get results you'd expect in real life. Things like adding more lights, boosting the Environment/GI levels to incredibly high values, adding some ambient lights with shadows turned off, etc. This all adds to the amount of calculations being made by the renderer for no real reason, as all of the data is in fact already there, providing you tell the program to show it to you correctly.