Here we have in depth explanation about what each render
setting does within Vray.
Here is what we found works for rendering settings using vray.
There are many stories on various forums on what makes a difference,
but I hope these settings will get people started and able to use
vray for production output; which are primarily what these settings
are for. However if you need more information as always visit the
chaos forums. (www.chaosgroup.com/forums/vbulletin/).
There are 2 other key methods, adaptive and using pure brute
force for animation passes which I’m hoping to put in another post…
watch this space and I’ll put a link to it when I get 5mins off the
work computer!
So the following goes through the 2 all important tabs within the
vray renderer, “vray” and “indirect illumination” tabs. The
common tab you should know from a basic knowledge of max, of which I
will not go into here.
So firstly there is the vray tab which is broken into the key
elements as follows:

1. When using the vray displacement modifier (will
increase rendering times) you may want to use this global checkbox to
turn on and off displacement.
2. You don’t need default lights- just confuses things in a lit scene.
3. Adaptive subdivision is suitable
for most. If you have really fine framing/ lines or shadow detail you
may want to use Adaptive DMC (we use this generally now).
4. I use area to give a slight blur
to fit with our background plates so it looks less CG, but depends on
the type of sharpness you want for your image. Experiment and read the
descriptions of each.
5. These 2 values alter your lines and edge
definition. Think antialiasing. -1 to 2 will give you pretty sharp
edges, much more and you’ll boost your render time quite a lot.
If using DMC 1 to 5 is pretty good quality. I use 1 to 3 for a lot of animation because you’ll never see a difference. Region render test and see whether you notice the difference, if not then go for th quicker render times.
If using DMC 1 to 5 is pretty good quality. I use 1 to 3 for a lot of animation because you’ll never see a difference. Region render test and see whether you notice the difference, if not then go for th quicker render times.
Also check object outline.
General tips for 6, 7 and 8 are try turning your lights off, then
adjust individually . This can be easier to see what is having what
effect on the scene…
Also remember if you have a material in the slot it makes the colour swatch and multiplier obsolete. The material slot tick must be unchecked for these to come into effect.
6. In your material browser either grab a spherical bitmap, vray sky or HDRI map.
This slot controls the Global illumination on your model. If it’s a bright red sunset then your model will appear red or pink from the light this map will give off. If using a vray sky the angle and intensity of your sun will come into effect through use in this slot, unless the vray sky is manually overridden.
You can then click and drag from the mat editor to this slot and make an instance this means you can control GI from your mat browser easily.
7. This is what will be reflected in your glass etc.
You can make an instance of the GI above this, but I like to have more
control over reflection, and associated brightness of each.
8. Refraction is important if say
viewing the corner of a glass building, where you will see through to
alpha. This slot determines what you will see through to. If it’s black
then it’ll be pure alpha (generally what you want), but if you are using
the GI map as a background then you should copy this background here,
otherwise your glass will appear black.
9. Usually leave as reinhard where a
brightness multiplier of 1 will give you a result like linear or
contrasty result and lower values will flatten the image and can help to
bring back blown highlights. Run it as high as you can without blowing
areas to full white to give you options in post-production.
10. If you find very sharp white blocks of light on your renders ticking sub-pixel mapping and/ or clamp output
can help to remedy this. There is a really good section on this in the
Vray manual that explains it better and generally, in a roundabout way,
recommends ticking these. If using linear workflow don’t worry about
clamping the output; despite popular belief white is white and there is
no range past this.
11. This motion blur doesn’t come into effect if
using a Vray physical camera, it’s all in the camera modifier settings
using the shutter speed.
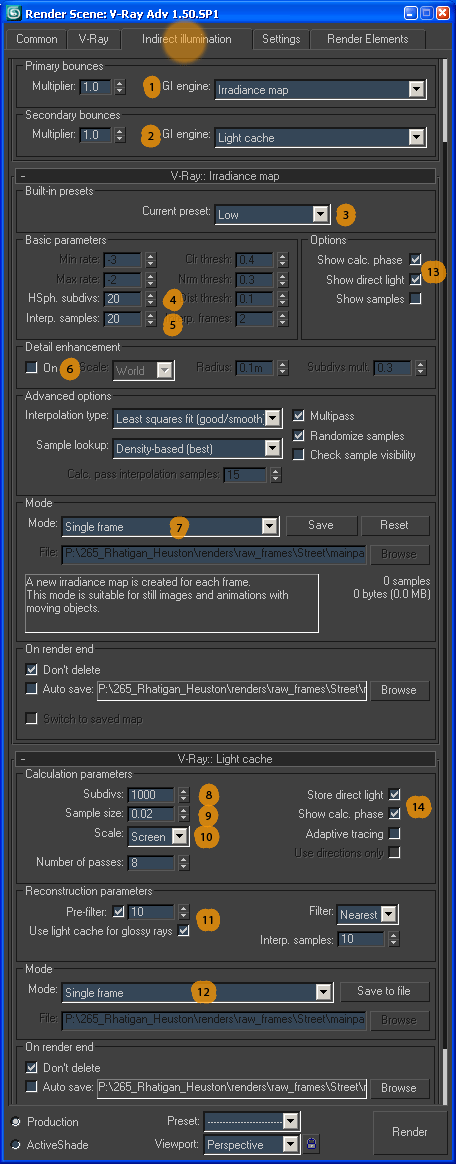
1. This is what happens on the first light bounce (primary). Set to irradiance map. The “show samples” checkbox will show you what it is sampling.
2. Set to light cache for the
secondary light bounces. If you want to see the product of each of these
2 types of bounces turn each on individually and test.
3. Low for testing, medium generally, medium
animation for animation. The difference in animation is in the “dist
thresh” which will smooth things out if you get the dreaded flicker in
your animations. Run higher if your render times are acceptable, but
visually test a range and if you don’t notice a difference then go for
the quicker option always.
4. 20 is low, 50 very high. Generally 20-40 is fine depending on testing or production.
Run this on low 15 20 for production high res stills, remember this is resolution dependant so the smaller the image the higher the subdivs must be to sample the detail. If you run 50 subdivs on a 5k image your wasting your time.
Run this on low 15 20 for production high res stills, remember this is resolution dependant so the smaller the image the higher the subdivs must be to sample the detail. If you run 50 subdivs on a 5k image your wasting your time.
5. Interp samples just evens blotchiness caused by
the samples. 20 is fairly sharp and generally what you would keep it on,
but you might notice some blotches on some large surfaces. A value of
100 will smooth these out, but will make the render “soft” or undefined
and will increase render times.
6. This can increase corner etc details as (if I
remember correctly) it uses brute force in the more heavily sampled
areas. This will significantly increase render times.
7. Single frame for stills and some animation. If
you have problems with flicker and nothing’s animated moving in the
scene it’s better to set to multiframe incremental and “bake” the GI to
a seperate GI file (the differences are explained well in the vray
manual)
8. 500 for quick, 1000-3000 production. Will send
your RAM through the roof on complex scenes so watch your task manager
and test a good value.
9. 0.02-0.01 for scene, and 10-100mm for world (depending on what you chose in 10 next)
10. Scene is good for stills, but can show as a
moire pattern that doesn’t move on large surfaces. So for animation
sometimes world is better, but alas sometimes gives you a more blotchy
result.
11. Pre-filter can be used to smooth out the
light-cache result, but can add to render times, so leave it off if you
can get away with it. Definitely tick light-cache for glossy rays this
saves huge amounts of time on scenes using glossy materials.
12. Single frame, but again (like 7) can be set to
fly-through to “bake” the GI to reduce flicker. But of course if you
have moving objects in the scene you would have to use single frame,
or separate these objects as a separate pass and combine in
post-production.
13. Tick both.
14. Tick both. However, you may want to uncheck show
calc phase when sending off to render. There is a little bug in Vray
were this occasionally sends the RAM through the roof when show calc
phase is checked.
No comments:
Post a Comment