Where 3d product visualization is concerned, one of the most important techniques for achieving realistic high quality images, is your ability to create studio renders. In this detailed 4 part tutorial you will learn every step necessary to create your own high quality studio renders with Vray and 3ds Max.
This tutorial is divided in 4 parts: Scene setup, materials, lighting, and rendering. In the first part, we will set up the scene, create a base, and import our models, in the second part, we will be assigning materials and using Vray lights to light our scene, and in the last part, we will adjust the Vray settings for the final render.
Note: This is a lighting and rendering tutorial. You will need to supply your own model in order to follow along.
Step 1
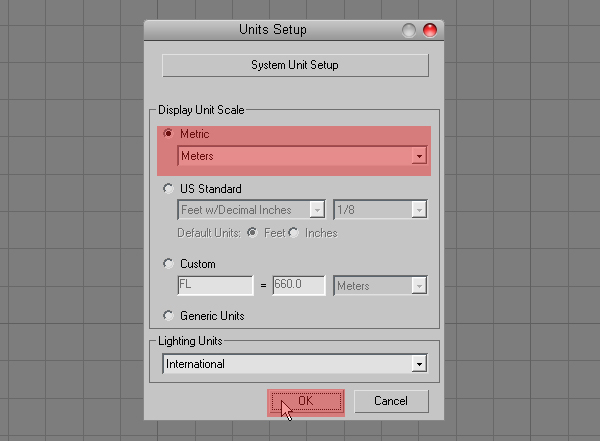
Open 3ds Max and set our scene units to meters by going to “Customize>Unit Setup>Metric>Meters.
Step 2
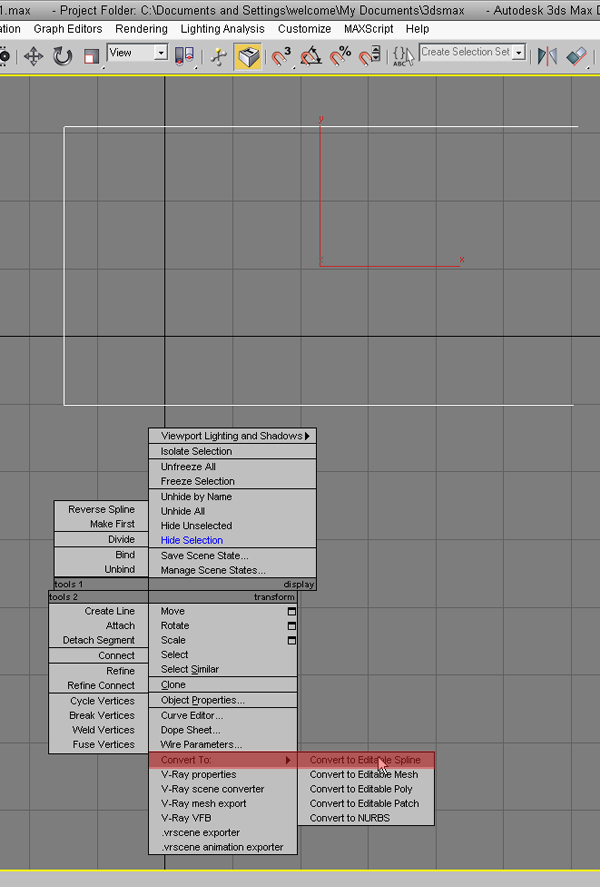
Now lets create an environment for our scene. Create a “C” shape with the line tool and convert it to an editable spline.
Step 3
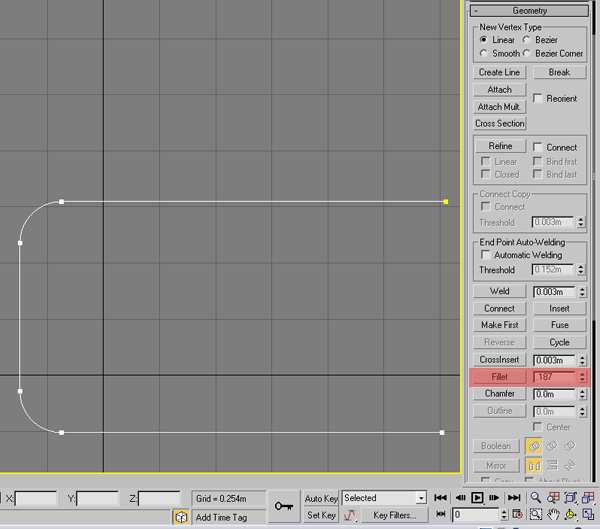
Select the corner points and choose “Fillet” with a .187m value. Also, set the “Interpolation Steps” to 10.
Step 4
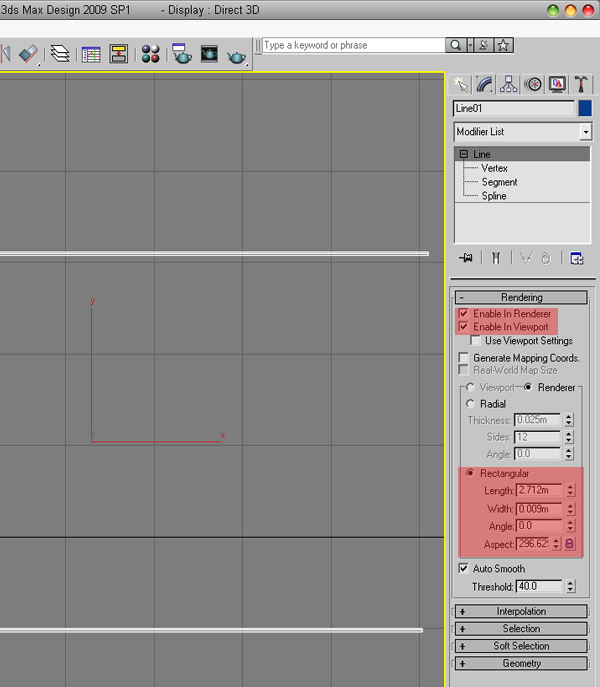
Select the line again, and in the rendering tab, check “Enable in Viewport” and “Enable in Renderer”. Select “Rectangular” for the type, and enter the values shown below.
Step 5
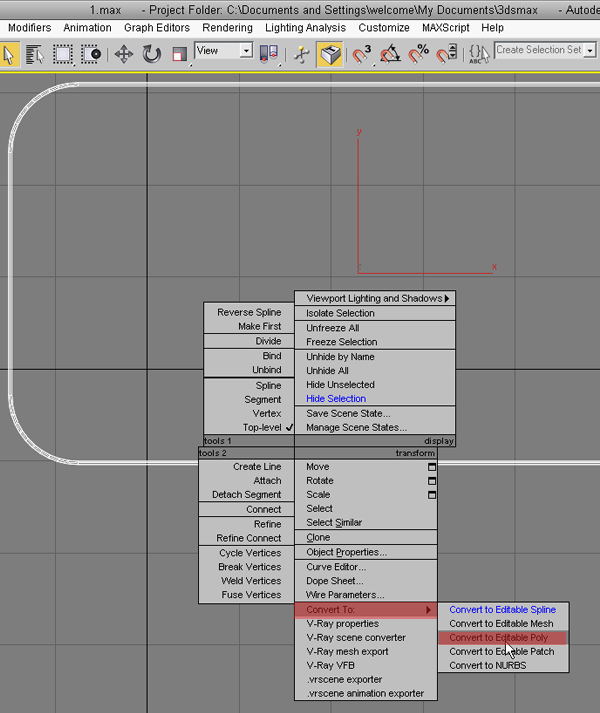
Now convert the line to an editable poly, and your base for the lighting setup is done.
Step 6
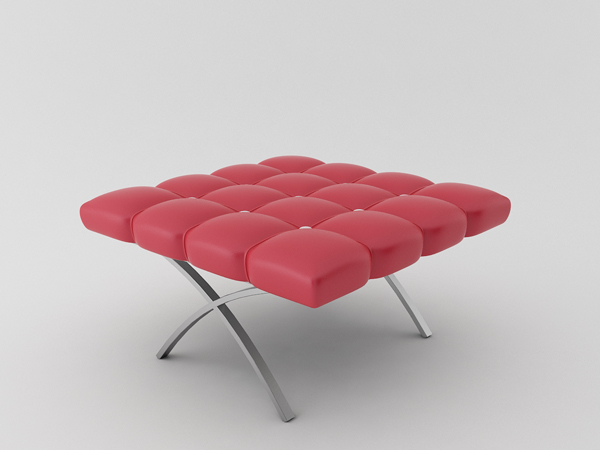
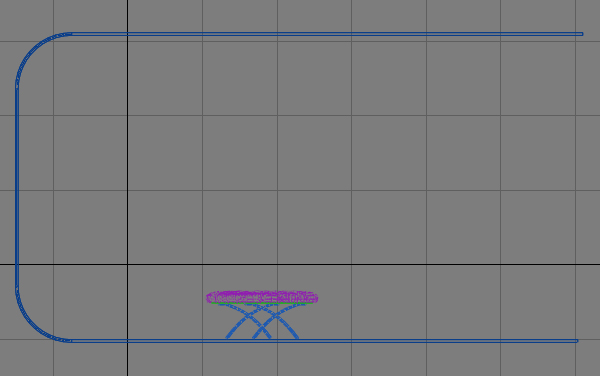
Import or merge your model, and scale it according to the size of the base. In my case i am importing a furniture model.
Step 7
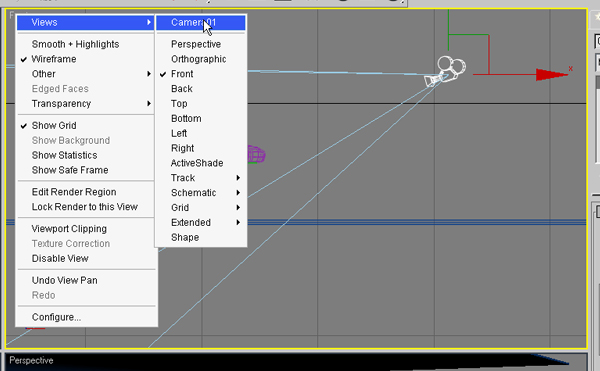
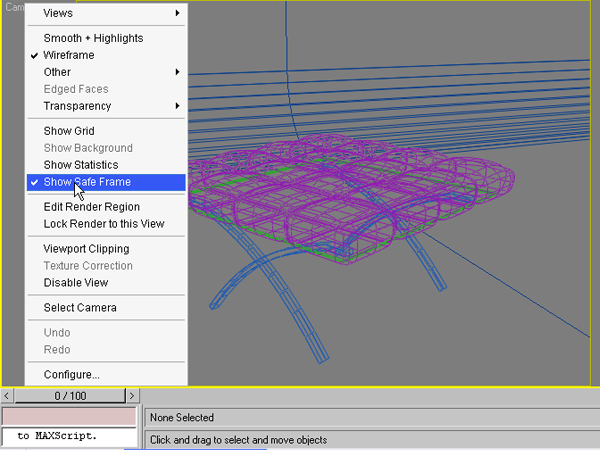
Create a free camera in the front view. Now, click on the top left side of the view port, go to views, and select the camera view.
Step 8
Enable the safe frame, and adjust the camera according to your scene and model.
Step 9
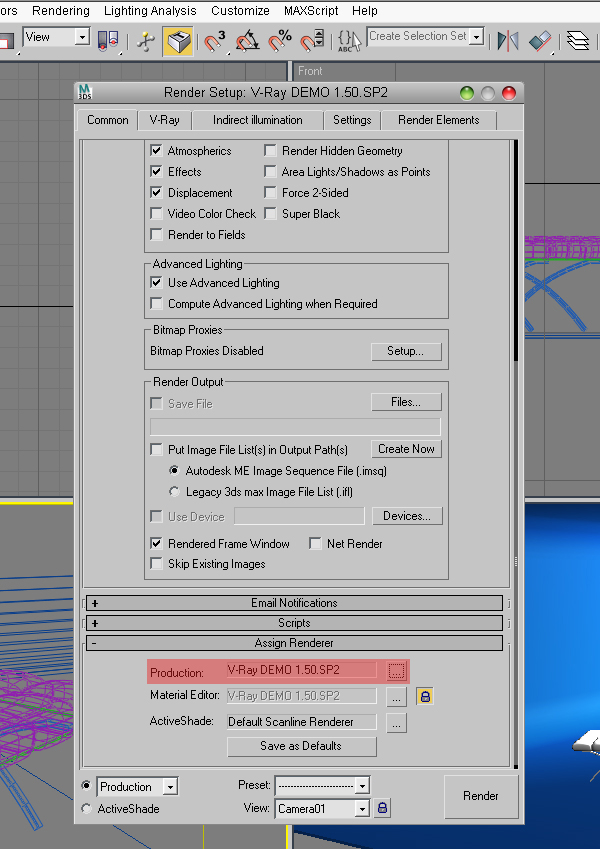
Press f10, and under production, choose Vray from the assign renderer tab. This will enable Vray as your renderer, and also enable Vray materials in the material editor.
Step 10
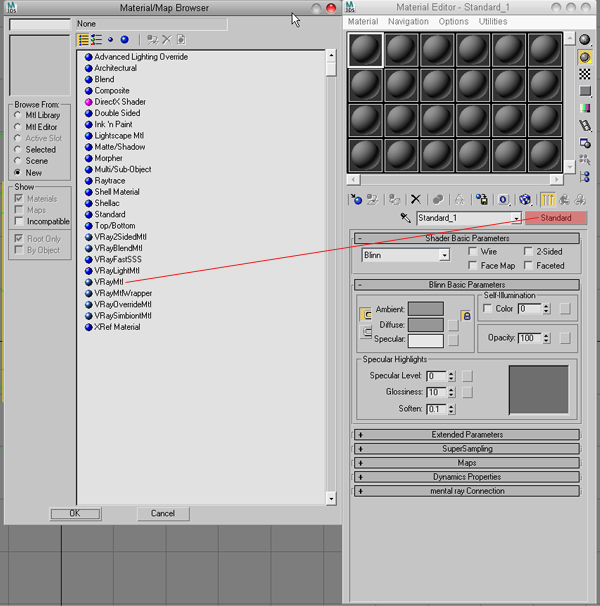
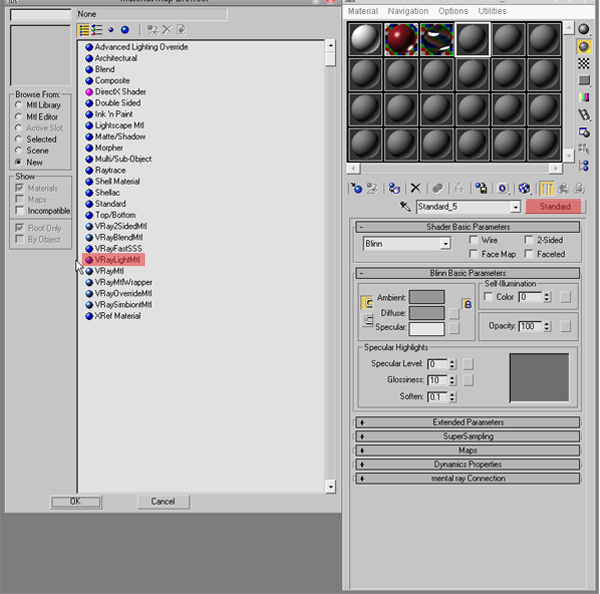
Press ‘M’ to open the material editor, then click standard, and then Vray mtl. The VRayMtl is provided with the V-Ray renderer. This allows for physically correct illumination in the scene, faster rendering, and more convenient reflection and refraction parameters.
Step 11
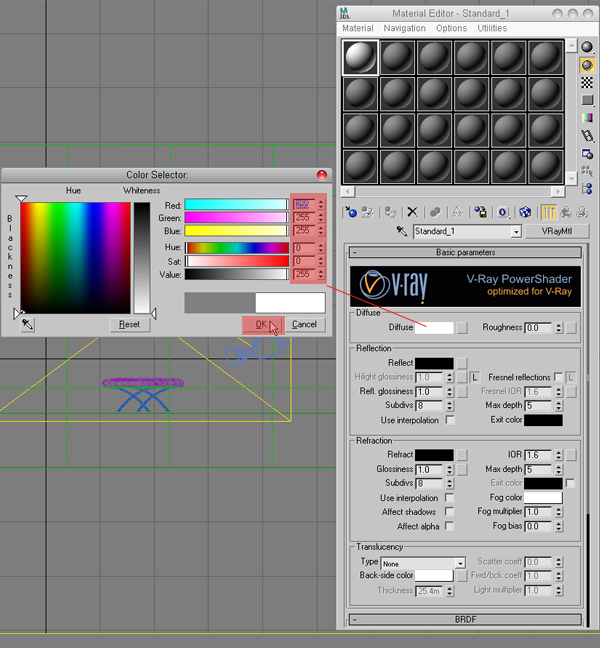
Click on the diffuse color and make it pure white and apply it to the base. This will help in bringing out the details and
getting diffuse reflections.
getting diffuse reflections.
Step 12
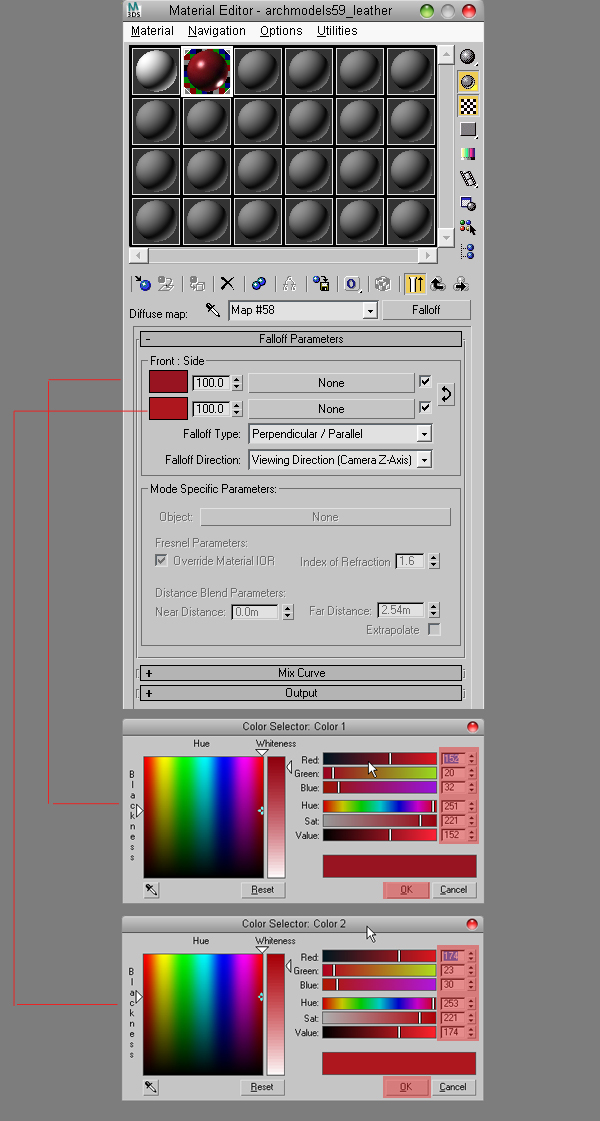
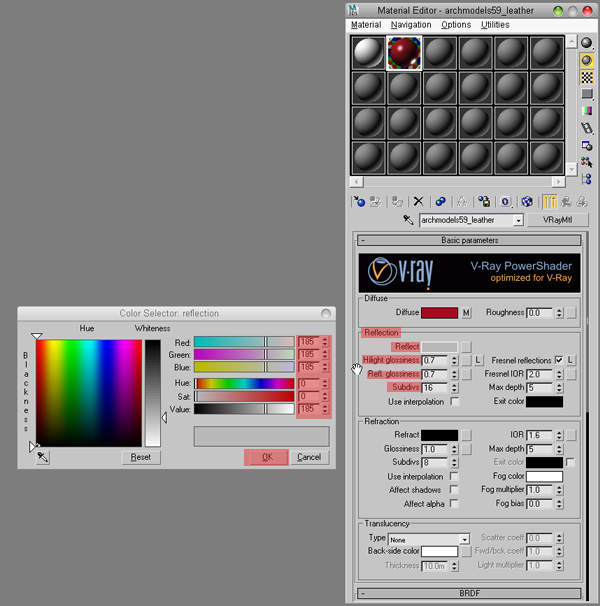
Now lets texture the upper part of the stool. The basic parameters that will be used in the material are:
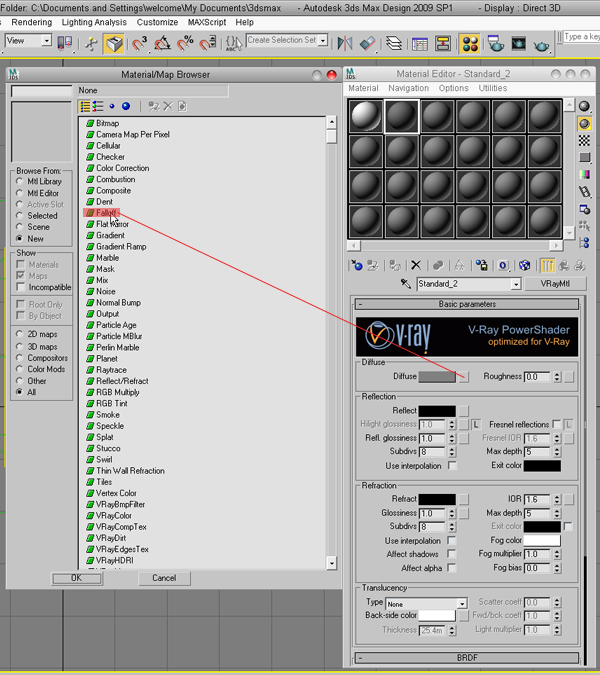
Apply a fall off map in the Diffuse slot (as you can see in the image). Also change the reflect color and bring down the reflect glossiness to .7 Apply this material to the cushion of the stool. Note: You will need to adjust the colors and various settings described to suit your own model.
Step 13
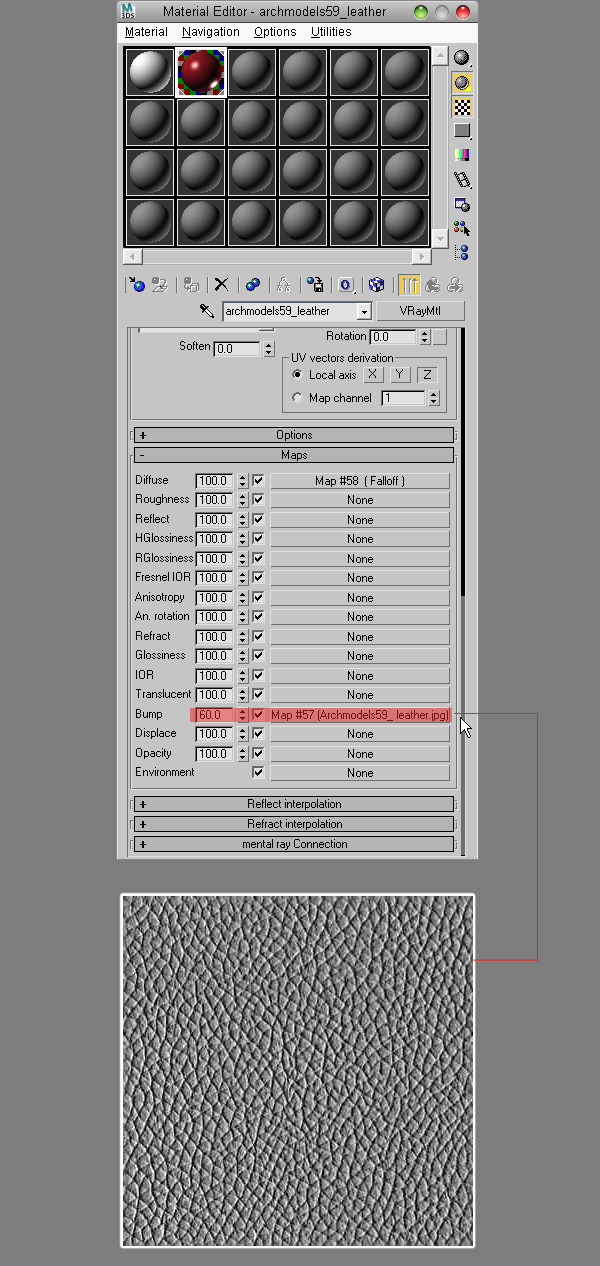
Now add a bump map, with a bump value of 60, in the maps area of the same material.
Bump mapping makes an object appear to have a bumpy or irregular surface. When you render an object with a bump-mapped material, lighter (whiter) areas of the map appear to be raised, and darker (blacker) areas appear to be low.
Step 14
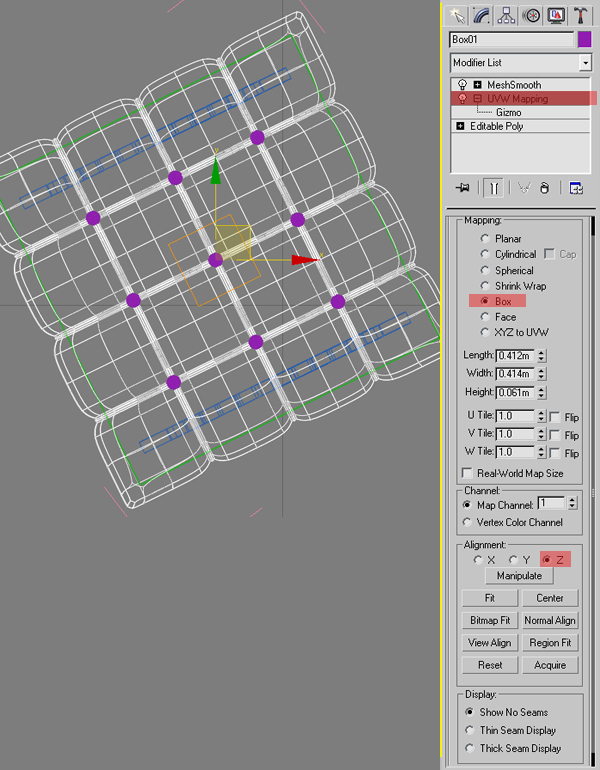
Apply a UVW map modifier on just the cushion, and select box as the type of mapping style. Also, scale the gizmo so that it can fit the bump map properly.
Step 15
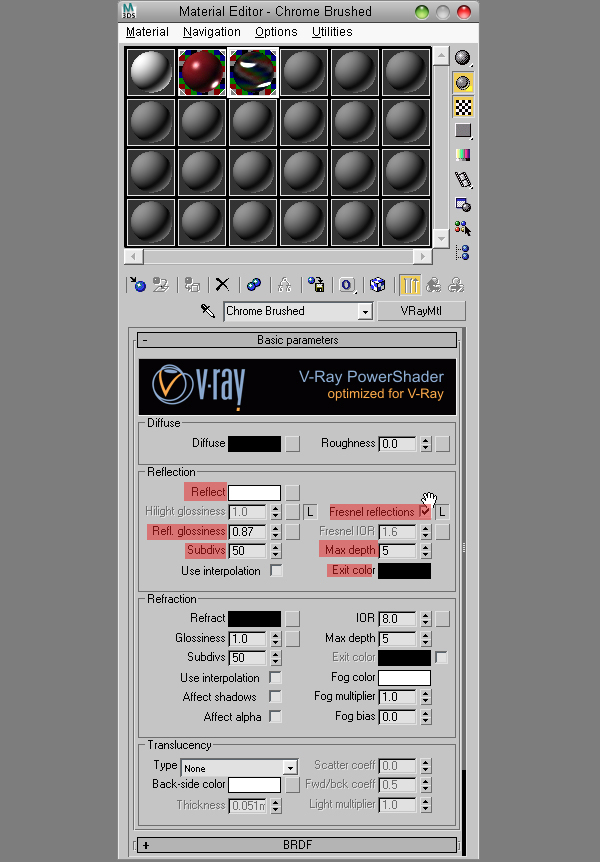
Time to create the shader for the metallic legs and the base of the stool. Here are the important parameters you will need to adjust:
Step 16
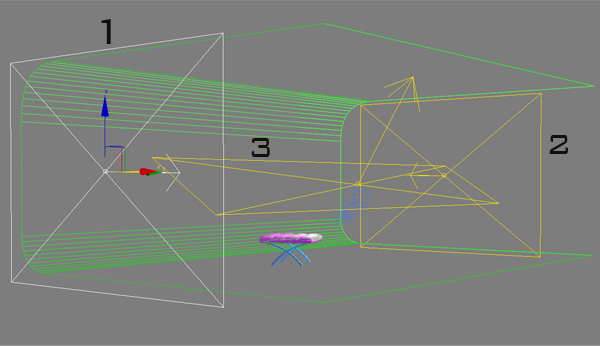
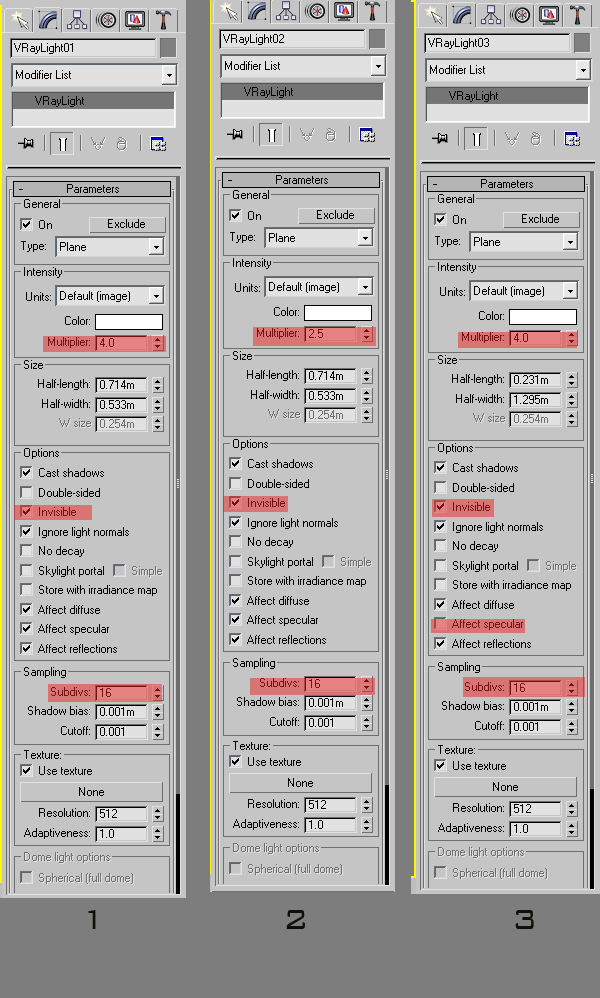
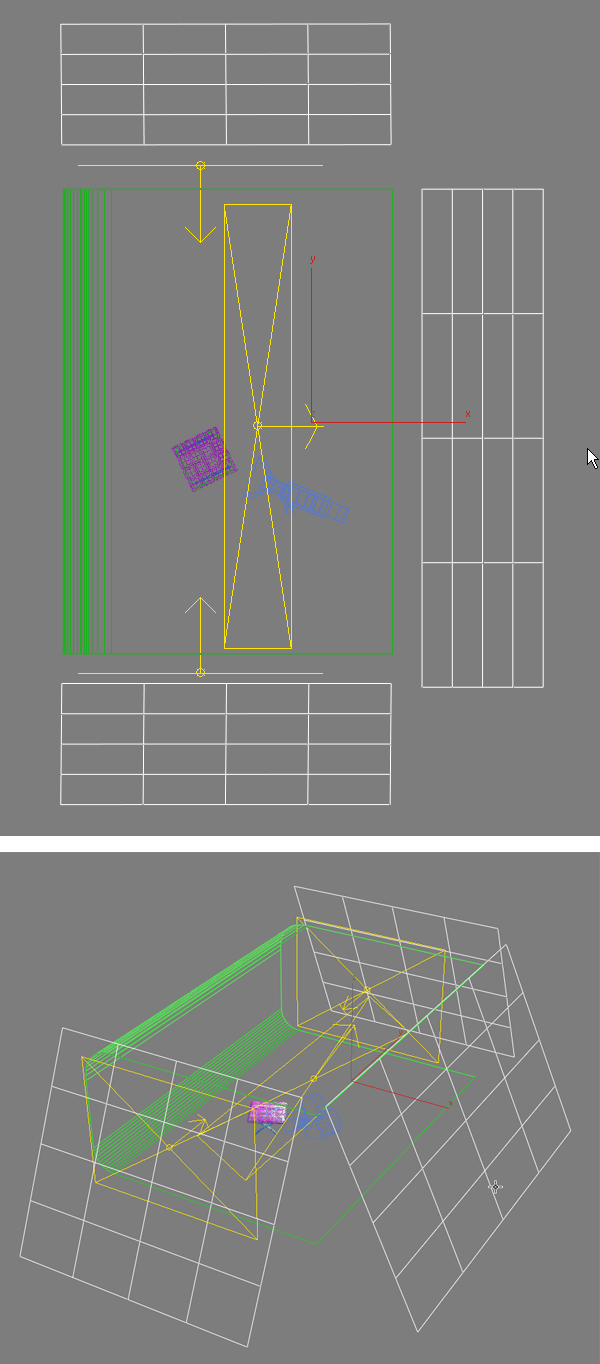
Now create 3 Vray lights in the scene. Change the multiplier, the color to white, and check invisible. The important parameters you should know are:
Step 17
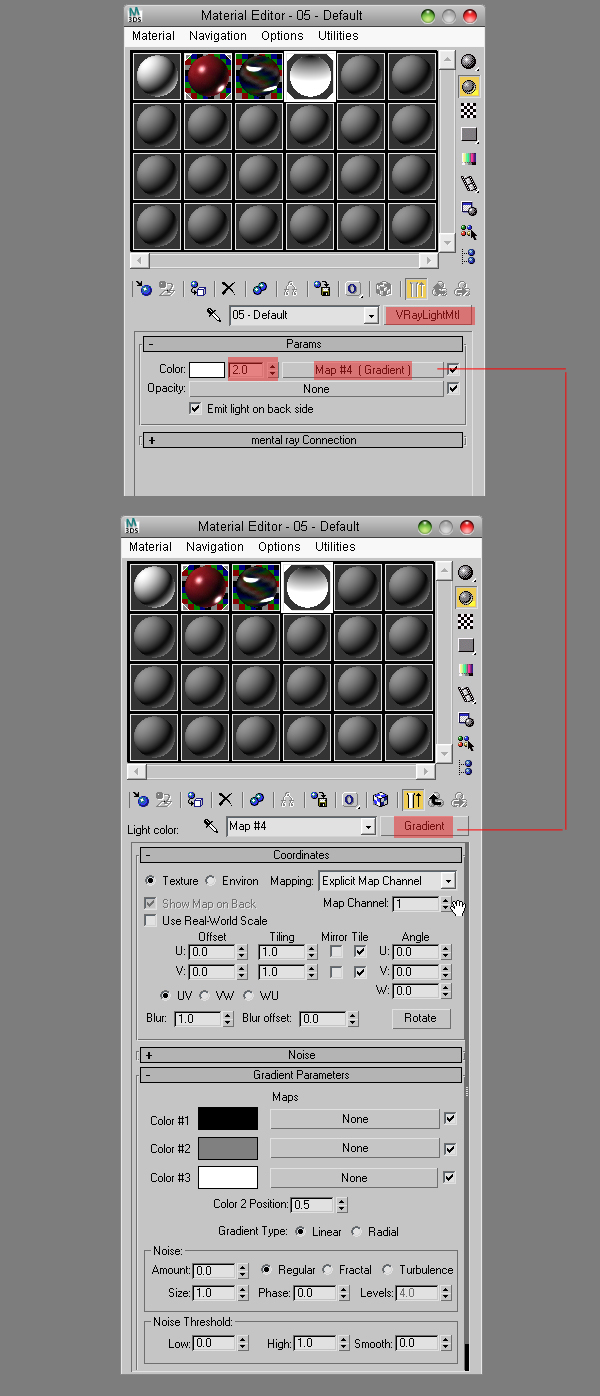
Create a simple plane, rotate it as shown, and apply a Vray light material to it. Add a gradient map on the Vray light material, and set the intensity of this material to 2.
Step 18
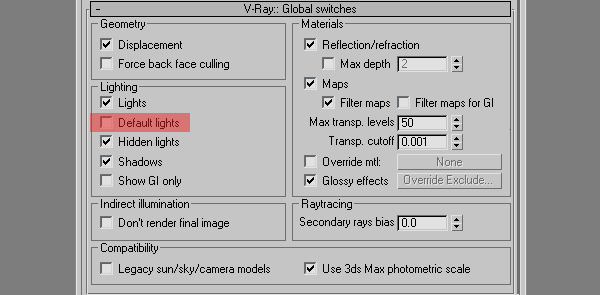
The following steps will be dedicated to the render settings for Vray. Press F10, and under “Global Switches”,
uncheck “Default Lights”. “Default Lights” allow you to control the default lights in the scene.
uncheck “Default Lights”. “Default Lights” allow you to control the default lights in the scene.
Step 19
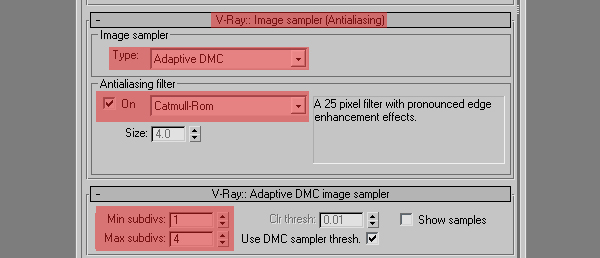
For the “Image Sampler” type select “Adaptive DMC”, and “Catmull/Rom” as the filter. Also, change the “Min” and “Max Subdivs”. Here is a description of the important settings:
Step 20
Under the “Environment” tab, check on “GI Override”, which will allow you to override the 3ds Max Environment settings for indirect illumination calculations. The effect of changing the GI environment is similar to that of a skylight.
Step 21
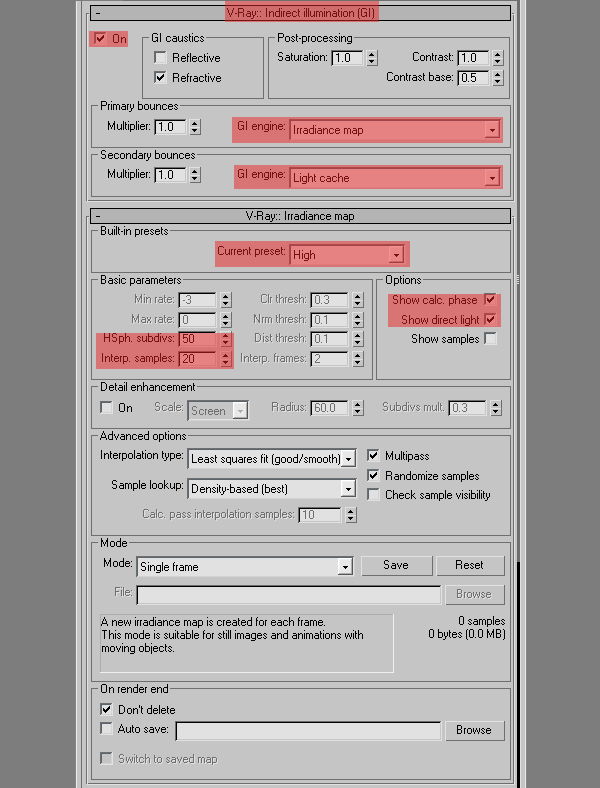
Under “Indirect Illumination”, select “Irradiance Map”, and “Light Cache” as the “Primary” and “Secondary Engine”.
Also, change the preset to “High hsph”, the “Subdivs” to 50, and the “Interp Samples” to 20. Below is a description of the important settings:
Also, change the preset to “High hsph”, the “Subdivs” to 50, and the “Interp Samples” to 20. Below is a description of the important settings:
Step 23
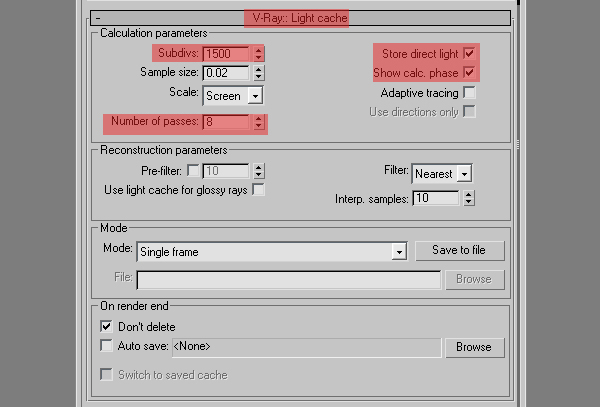
For the “Light Cache” set the “Subdivs” to 1500, and for “No of Passes” set the value to 8.
Step 24
Hit render, and you’re done. You have just created your first studio render !!

May Ihave the scene file..
ReplyDeleteIs there any way, i could have the scene file?
ReplyDelete